Last week I shared my perspective on playing as Romans in Caesar: Rome vs. Gaul. Just as a reminder, I had a chance to try that fantastic game thanks to Dave (Dude! Take Your Turn!) whose copy delivery was delayed on US-Canada border due to pandemic. So only digital session was an option.
I can openly say, we both get hooked by this title in our first game. This is another asymmetric jewel and masterpiece of Mark Simonitch. Still, to get the full fun from it, it is really advisable to play couple of times. Once you are more familiarized with mechanics and events, you definitely can better prepare and feel even more excitement from the play.
You can find more about the game and our first session in the last week article: Caesar: Rome vs. Gaul – playing as Romans. In below text I will try to sum-up how it went this time plus also write perspective of Gallic side which I had a pleasure to lead this time.
Session
In our first game we decided I will take Romans while Dave will be playing Gauls. It was first real wargame for him after many years so we thought it prudent for me to take on more complex and active faction. Now the time has come for me to lead the disunited Gallic tribes!

A short legend to below report:
- again, in red I marked Roman developments, axis of attack, killed tribes (stars on map) and any other significant events; I am also marking the controlled provinces in that way
- in blue you can see which tribes arrived at the beginning of the turn plus how the Gallic influence spread; plus of course controlled provinces
I am using a new feature of WordPress – Compare Images – I hope you will find it useful and interesting! Just use the slider and move it right/left. I find it really cool! Enjoy!
TURN 1 – 57 BC
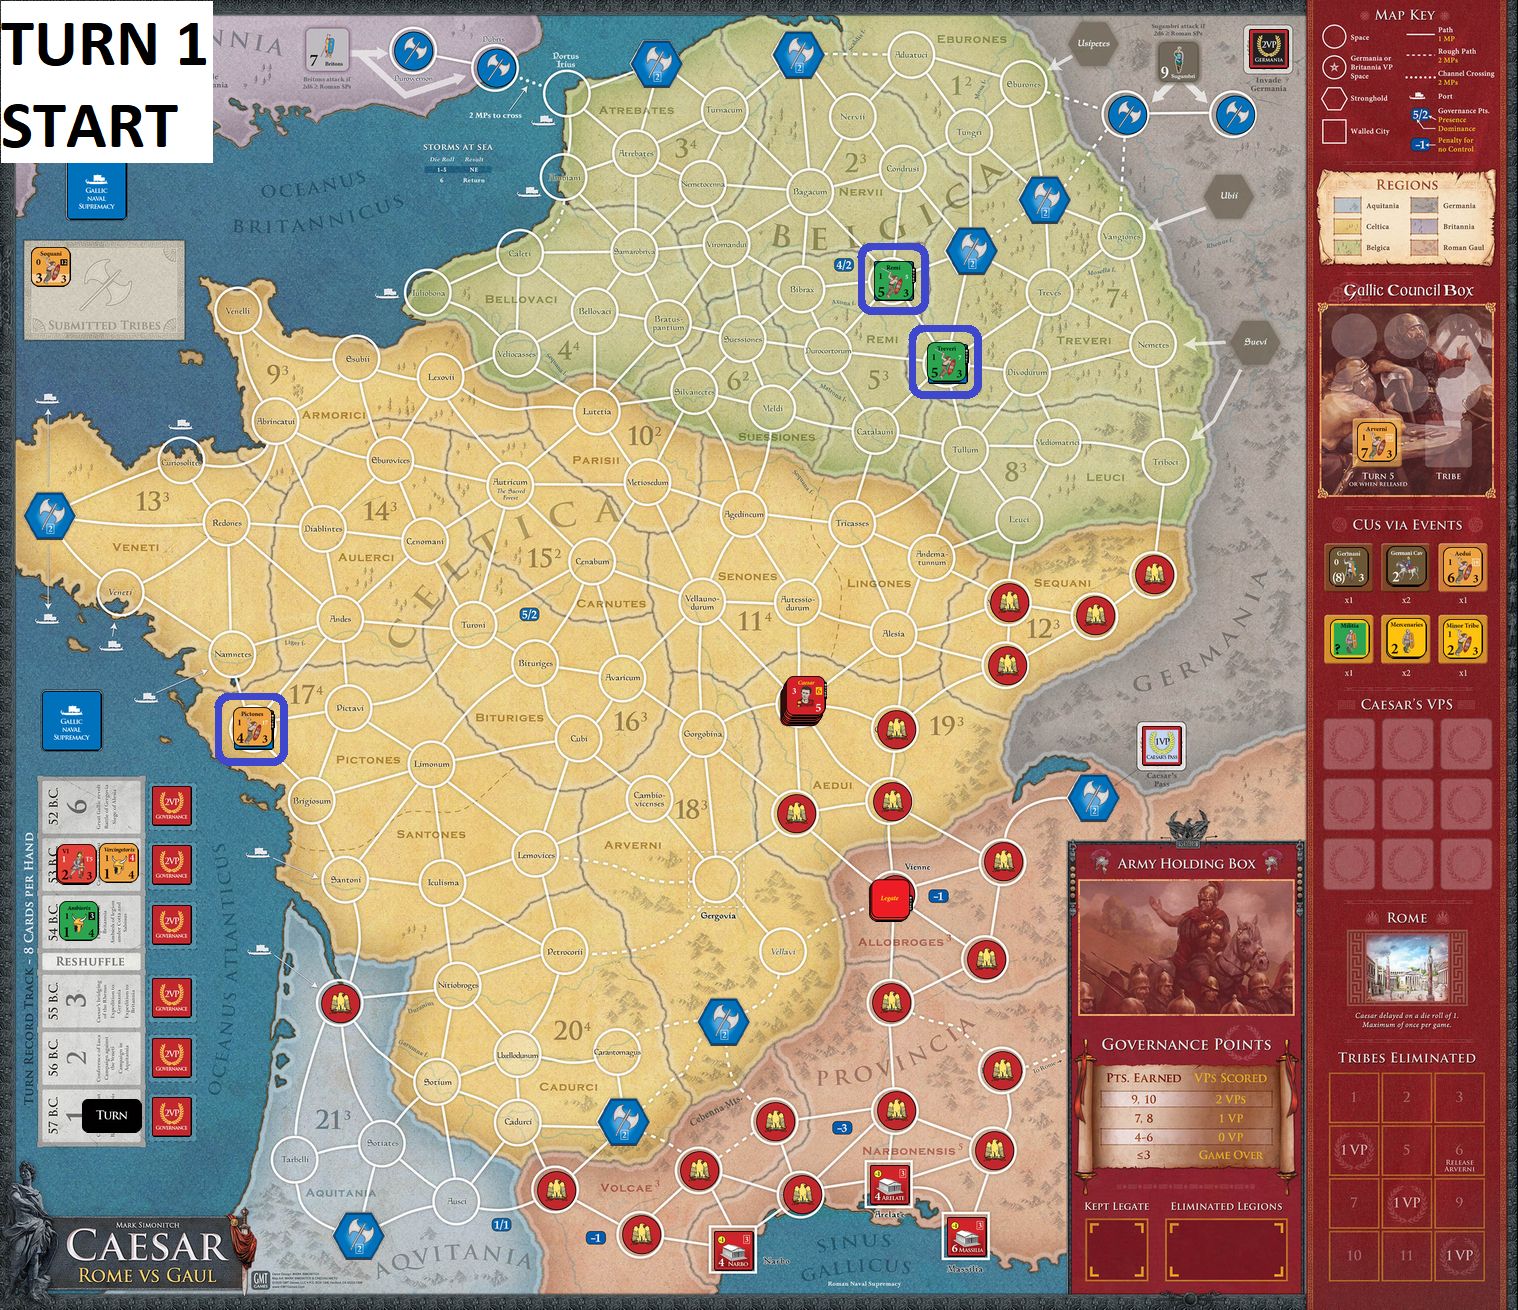
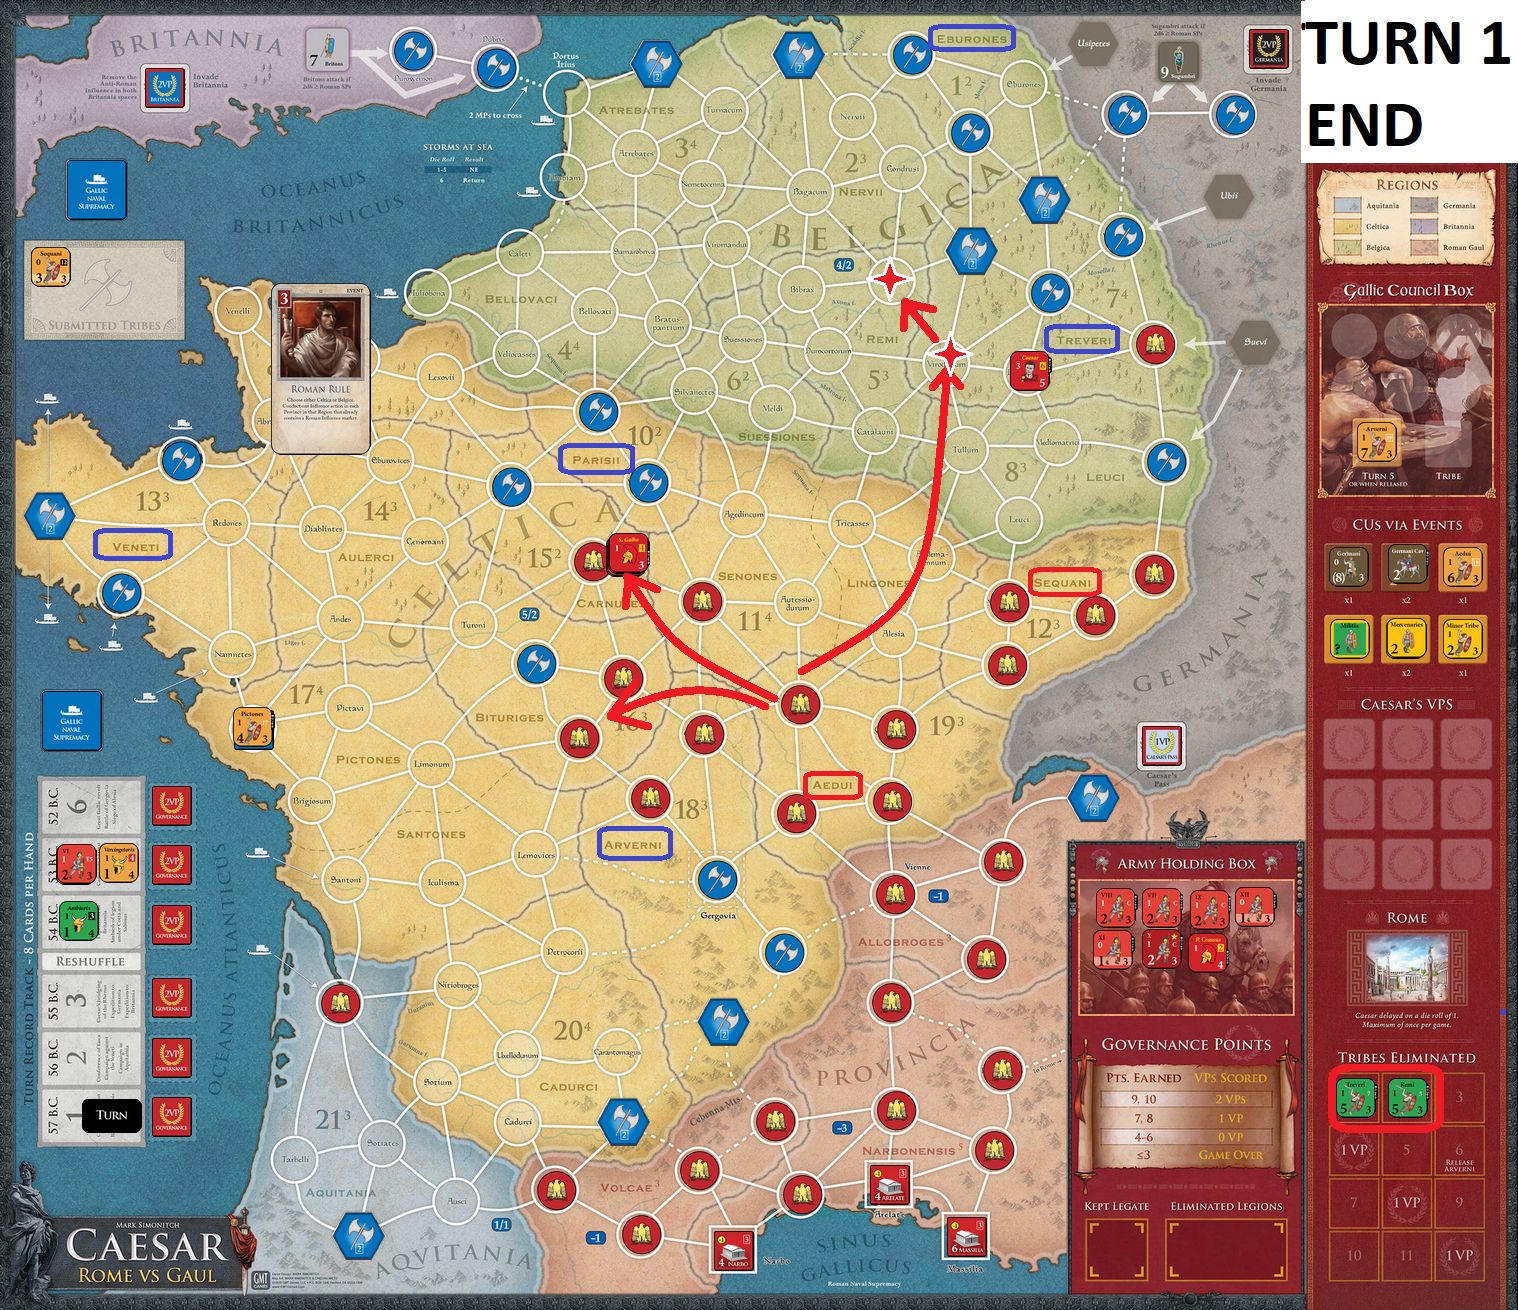
Key developements:
- I start with Remi, Treveri and Pictones
- The first two will be crushed by Caesar sieges during his incursion in Belgica
- I am focusing mainly on sitting tight in towns and spreading the influence, while prolonged Roman sieges take it toll – not in human lives but in time
- That allows me to deny Caesar the dominance in Celtica/Belgica
- Score: Governance 5 => 0 VPs for Rome so far
TURN 2 – 56 BC
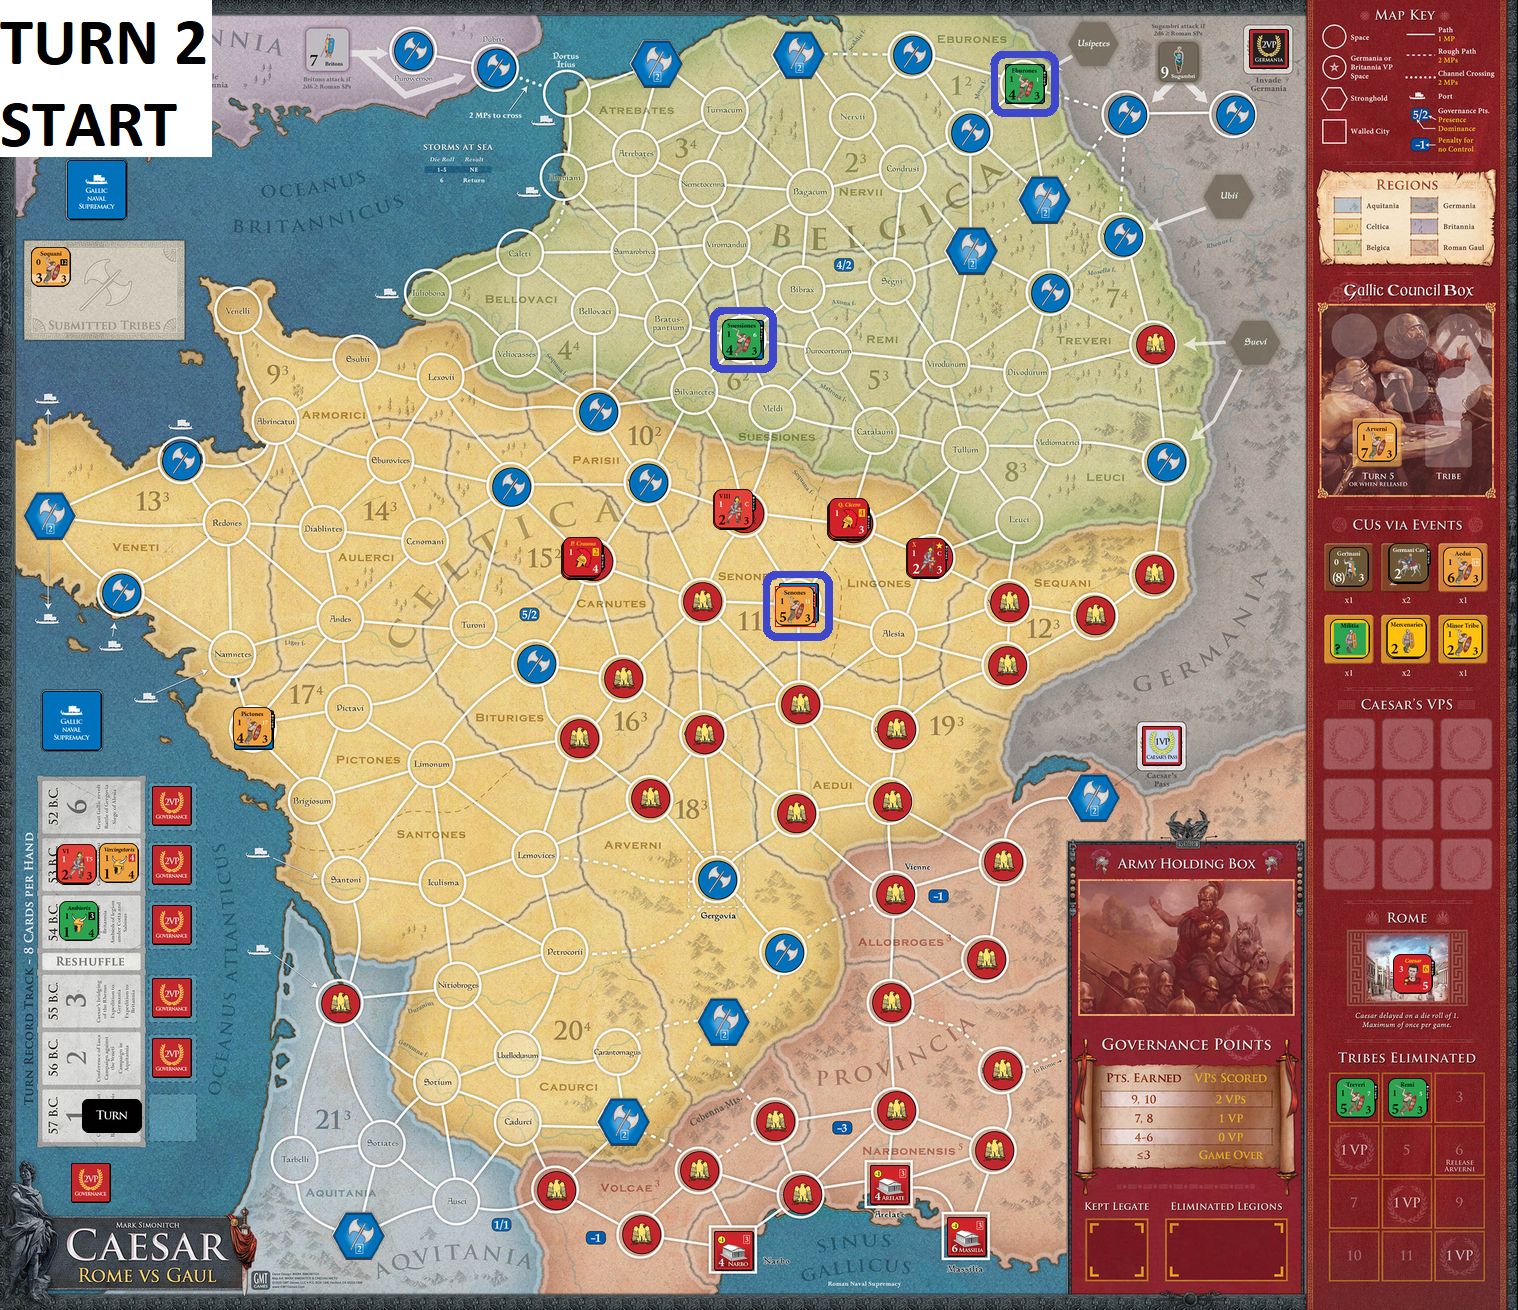
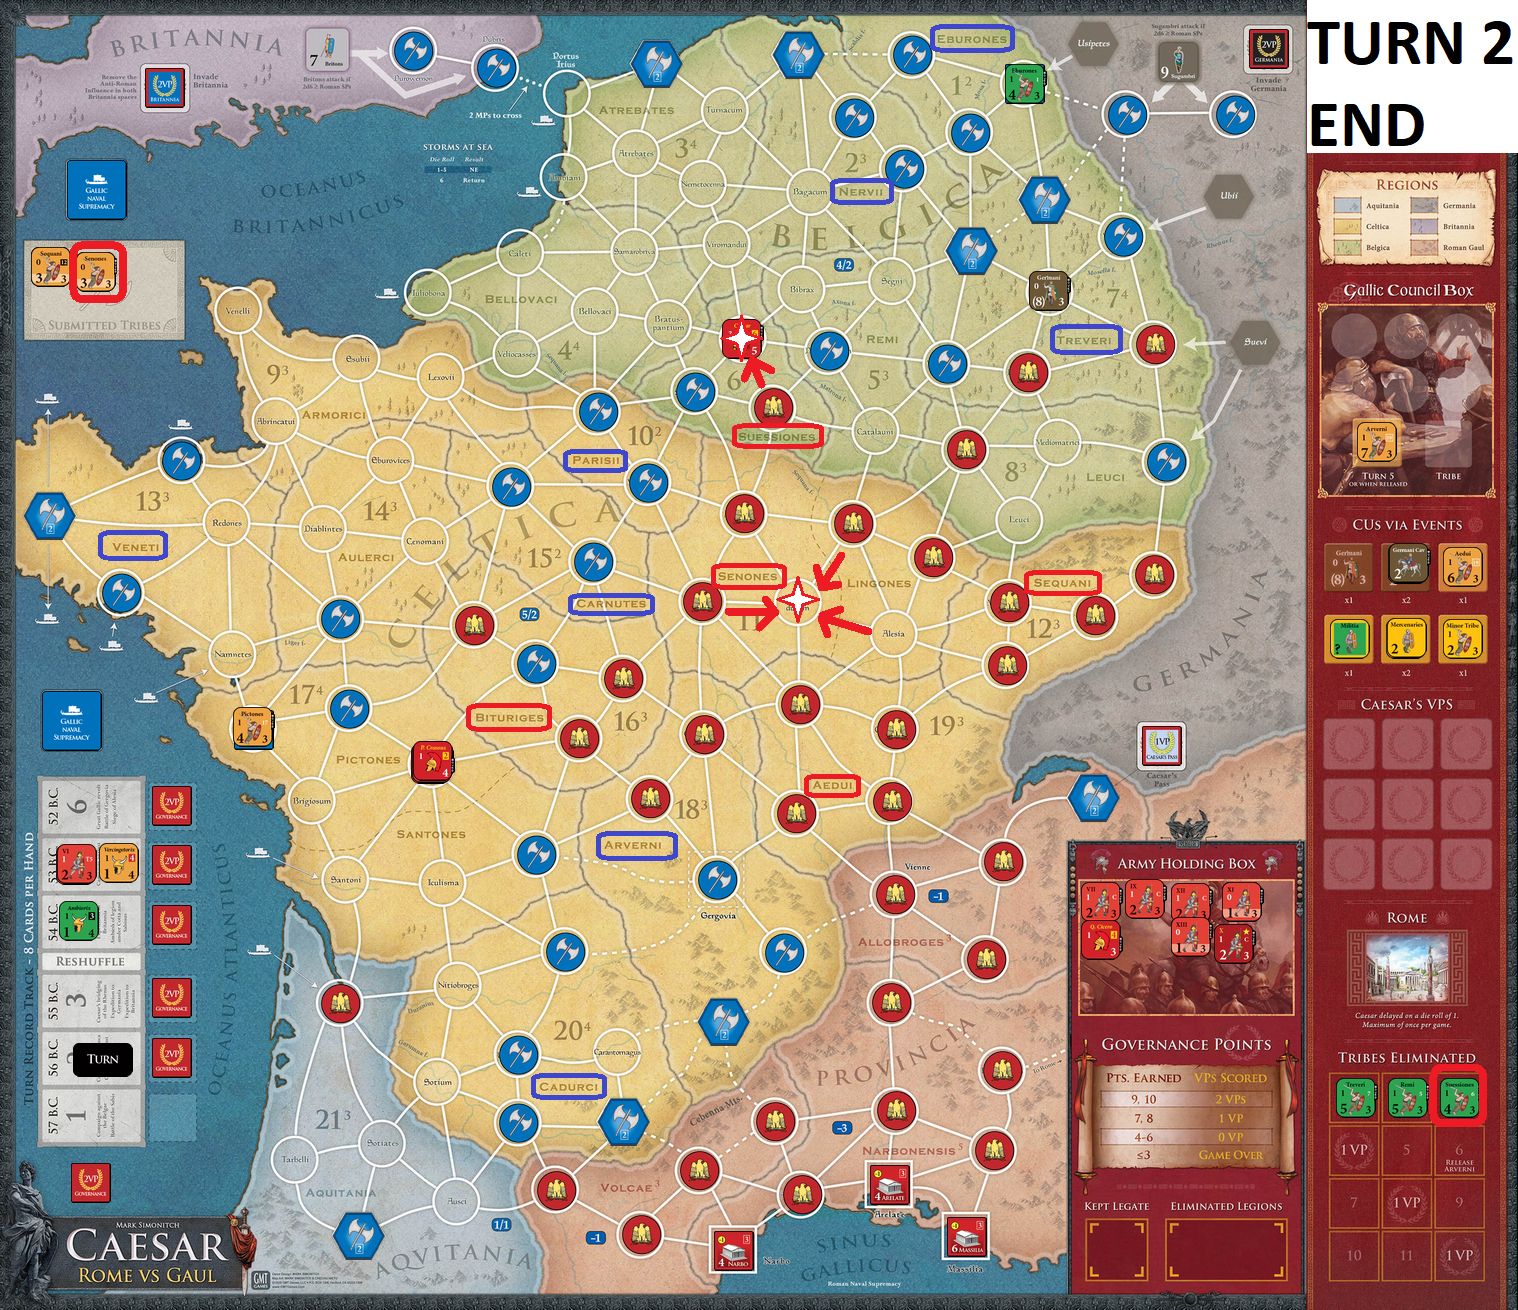
Main actions:
- This time I am getting Suessiones, Eburones and Senones; especially the last ones are thorn in the supply line for Rome so this is not a big surprise they are outright attacked and submitted; Suessiones follow even worse suit as they are eliminated
- So far we played mainly keeping the best card till the last moment; that turn (I think I got it right) taught us not to do so; Gauls have an event allowing them to draw a card from Roman hand and use it, giving 1 AP to opponent instead; I used it here – it did its trick in Round 8, but I think Dave’s intuition somehow warned him as he played Help from Crassus just a round earlier… That is only one of the examples how great this game is – there are no pre-defined strategies which are always right
- I have again mainly stayed in towns, praying for long sieges and spreading influence; it worked…
- Score: Governance 5 => 0 VPs for Rome again 😦
TURN 3 – 55 BC
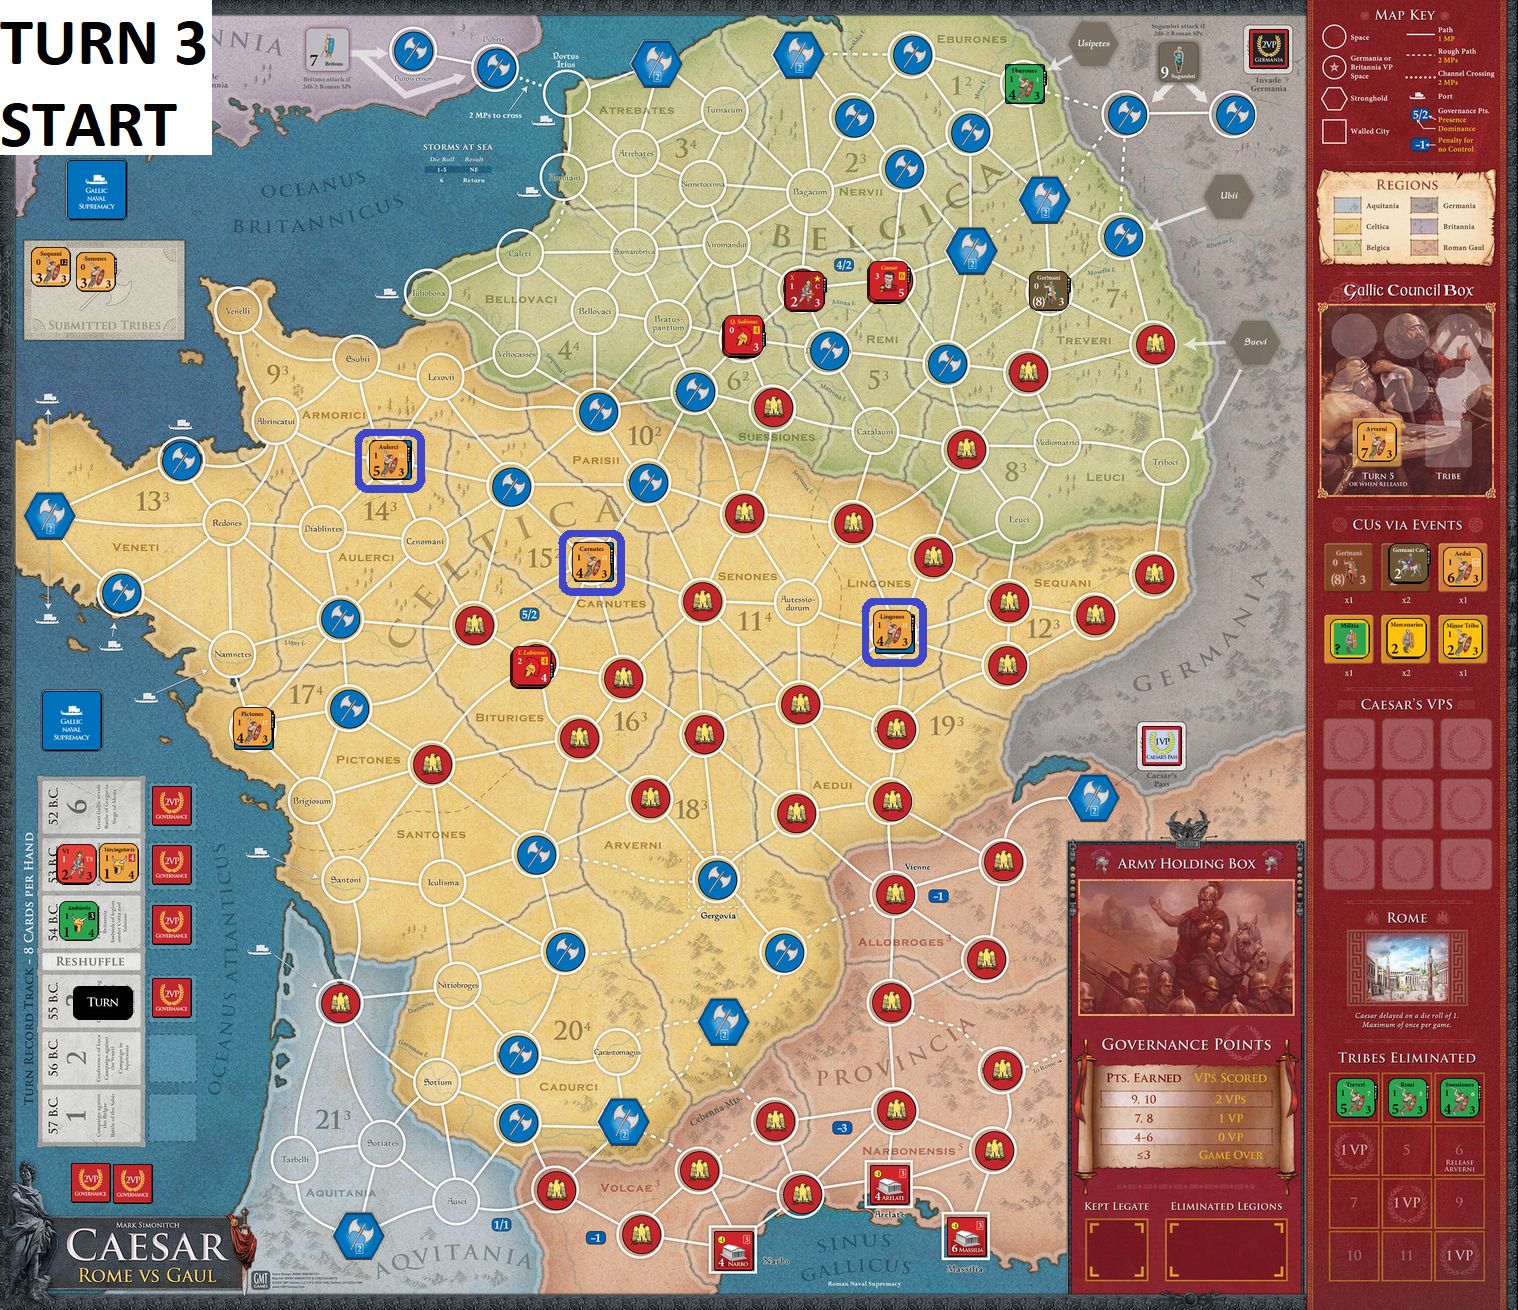
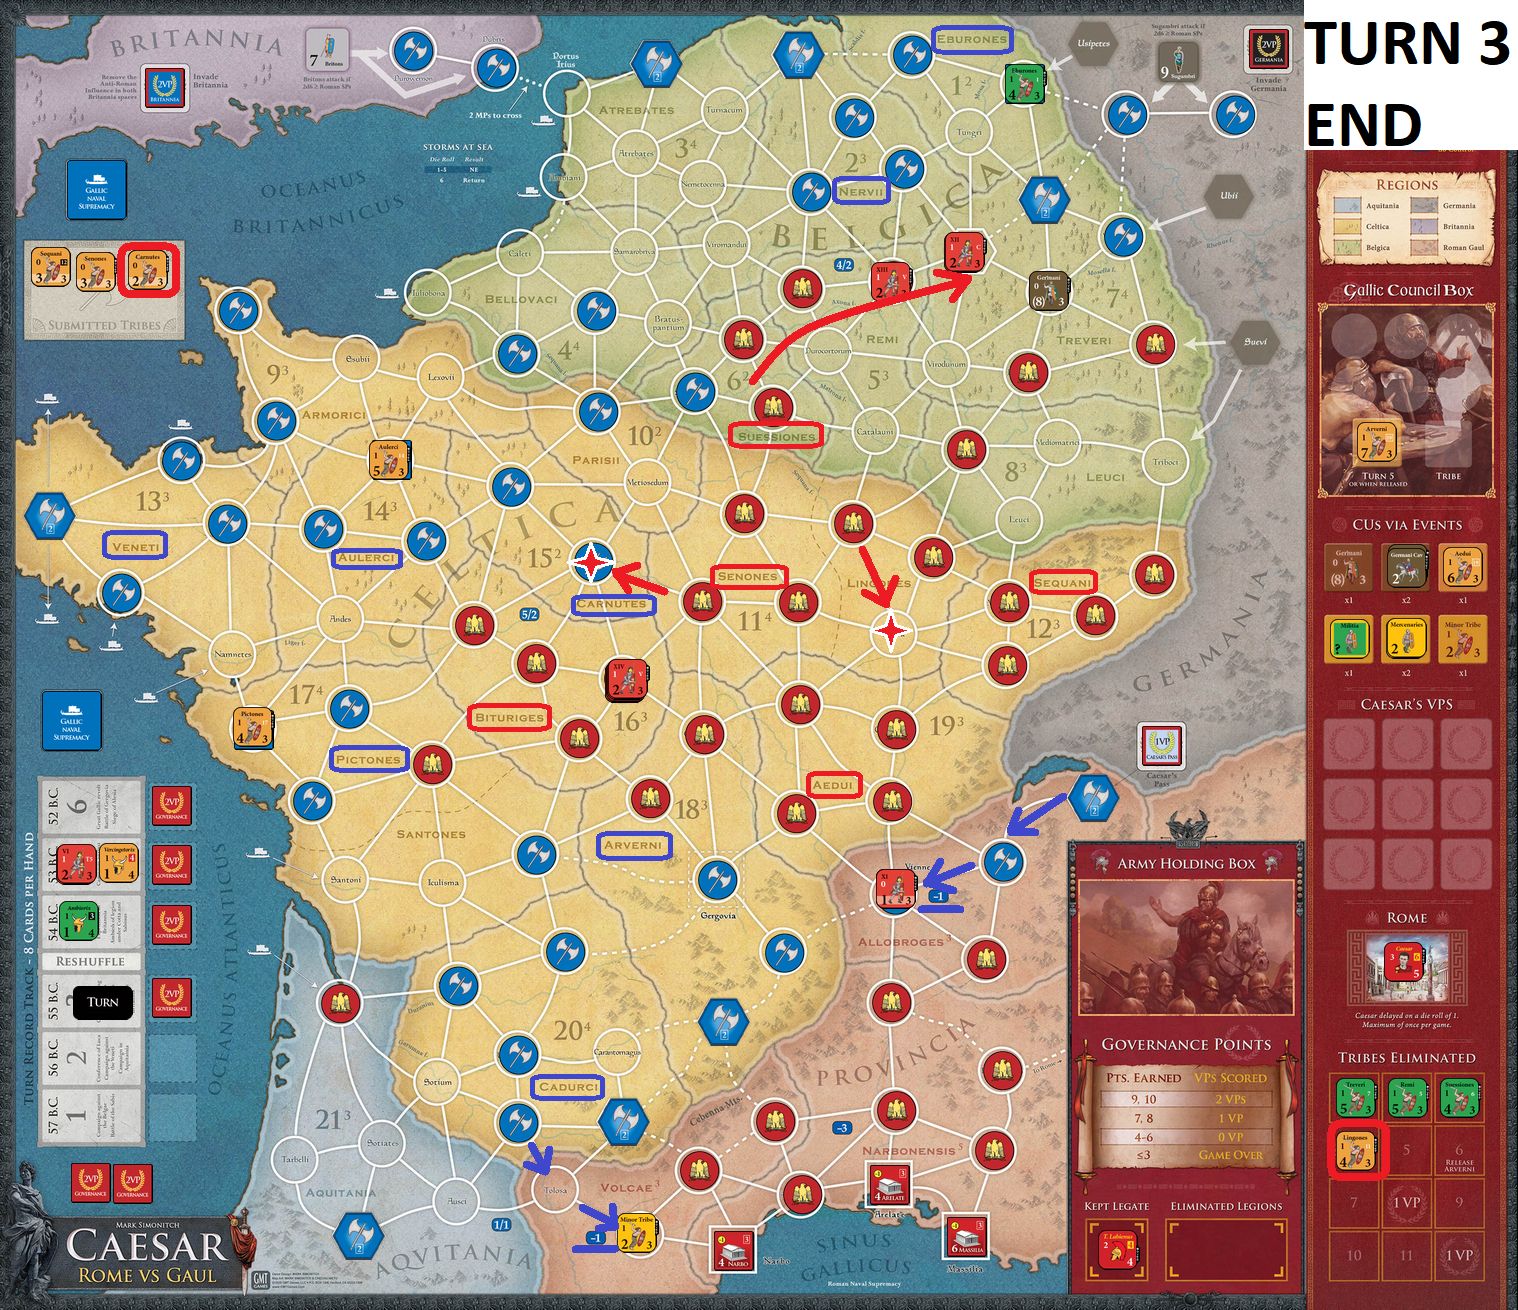
What happened:
- So far I had many tribes in Belgica, so it was not a surprise I got finally full 3 in Celtica: Aulerci, Carnutes & Lingones.
- Again, aggressive Caesar moves submitted or eliminated the last two.
- Still, the main and most interesting action happened in Provincia. First, I spawned Minor Tribe which gradually un-flipped Volcae
- Then using a nice and smart card near Gallic stronghold, I removed Roman influence marker in Allobroges and started to place Gallic ones; Rome’s legions were so far away in Belgica that I managed for a moment to cut the supply lines! All this was possible due to the heroic sacrifice of Lingones!
- At this moment the turn finished; still no Dominance of Rome in Belgica and Celtica, and with lost control over Volcae and Allobroges…
- …score: Governance 3 => auto-win for Gauls!
Observations from the Gallic perspective
Again, I would like to share couple of things I learned playing – they to some extent also touch on the Roman strategies as those are of course strongly interconnected:
- Caesar pass – I put this as number one in Rome’s observations and I will do it also here; one of the key points on the map which with proper cards allows Gauls to wreak havoc behind the Roman lines; I think my actions around it tipped the balance of the game
- Be patient! – staying in towns and playing mainly Influence in first Turns is not a bad move; sure, you will lose most of the tribes, but not a of them and your situation on map will improve
- Gallic March – you may think that before Ambroix / Vercingetorix joins the rebellion you can attack only with 2 tribes? Wrong! You can move as many tribes as you wish (they have 3 hex range) to one spot within 1 of enemy units during the Gallic March; and then move a whole stack for a move cost of 2 (over-stacked intrinsic leader still can order that group, just pays more movement points) and crush the Romans. It is thus doable but here comes something to remember about…
- …which is Caesar great mobility – you may maul one or two legions but if you are too far away from your town, Caesar will quickly and efficiently subdue your attacking force. That is the reason not to abandon towns without really important reason. Again, be patient!
- Cut the easiest path to Germania – I find it really effective – and whatever cost Romans time is effective – to use at least 1 influence marker in Treveri to cut supply to Germania.
- Supply lines – they are really key, and the maneuver which I managed to pull out in Turn 3 shows how important they are!
These are the basic insights – having two games played I think some fundamental understanding and common sense what to do in the game starts to emerge!
Summary
That was again a good game although I am sure Dave can fell a little mauled. Playing as Romans is really difficult and can be plagued sometimes by bad siege rolls (we had some of them in our game). Still, that was a fantastic time, playing really well designed game with a boardgame friend. For sure, not the last such occasion!

This was a fun game, but it really showed that I didn’t play well (mostly due to inexperience, I would think). That being said, you also played the Gauls really well, emphasizing that patience is definitely a virtue with them.
One thing, though. I didn’t intuit that had the “take a card from the Roman hand”. I had actually completely forgotten it existed.
I just really needed to play that card when I did. The moves you were making forced my hand, because otherwise I was saving it for the final round.
It was fortunate happenstance.
Thanks for posting this! I’ll try not to be too embarrassed by having my dismal performance made public. 😛
LikeLiked by 1 person
This is all learning and the most important thing for me is that I discovered fantastic game playing with a friend!
LikeLiked by 1 person
Nice write-up, I really like the sliding images.
It looks like the Gaulic player did a good job of distracting the Romans here, but I think as the Romans you really only need to maintain dominance in Celtica. Belgica can come later (or never at all), as long as you keep 1 Influence there you will still get your 1 VP for governance each turn.
Looking forward to hearing about the next play!
LikeLiked by 1 person
Thanks for the insight! Indeed, focusing fully on one and only getting presence in the other might be the way to go. Still, in our first 2 turns 4 Belgae tribes appeared – you cannot leave them completely unmolested…
LikeLiked by 1 person
That and if you’re only getting 1 VP a turn, you better invade both Germany and Britain and open the pass! Or kill lots of Gauls. That’s a risky strategy in my opinion.
LikeLiked by 1 person
Great report! Also loved the Compare Images to see the developments of each turn!
LikeLiked by 2 people
Just recently started to look through various blocks and found that “compare” one. I am getting used to the Block Editor finally!
LikeLiked by 2 people
You are way ahead of me! I should probably check out those blocks as well 😀
LikeLiked by 1 person
Great write up. Thanks for doing these.
Couple questions about your Gaul Observations:
1. The section on Gallic March (which I believe is the Spring Muster), you mention gathering up within 1 hex of Roman CUs and then move the “oversize” stack with an action for 2MP . I thought the Spring Muster movement was not allowed in any location that could be intercepted. i.e. adjacent to Roman CUs
2. You mention cutting supply to Germania. Why do they need a supply line? I’m not sure what this means.
LikeLiked by 1 person
ad1. I do not have rules handy, need to check it
ad2. Caesar legions without supply will start to lose its strength; to attack Germania you cannot go with small force (there is potentially a 9-strength opponent there – who might fight more than once). On the other hand a large army will incur losses every turn without supply. Just see the map how easily can the ill-timed Caesar trip for German glory can end.
LikeLiked by 1 person
Ok, so you mean cut supply lines to Caesar if he makes a run for Germania.
LikeLiked by 1 person
Yeah, Rule 6.2 does say that they can’t enter a space where they could be intercepted.
I think maybe we played that wrong. Or maybe it never came up, I’m not sure.
LikeLiked by 1 person