
In the first two instalments (you can check them here: Part 1 & Part 2) we explored strategy for the attacker breaking the line. In this final instalment we will consider the role of the defender.
Holding The Line
If the decisive moment of engagement of the lines is so important to the attacker, it is equally important to the defender, who has as much to gain or lose from the outcome. Why one army might become the defender in the clash of arms is dependent on many things. Perhaps a disadvantage in command or unit strength, or an advantage in positioning and terrain, might lead them into a defensive stance. Perhaps the scenario offers no clear orientation between attacker and defender and both armies are poised to be either, until one commander takes the initiative. In that case a commander needs to be prepared and positioned for either role.

We have already discussed at length the advantages that a defender has, specifically the likelihood of double close combat rolls through consecutive battle back and ordered attack, and the availability of nearby fresh reserves. Yet we have also seen how an attacker can disrupt an enemy line and essentially destroy the army. What else can a defender do to mitigate this risk?
First and most important is to shore up all those potential weak points that we have sought to exploit as the attacker. Above all, it is imperative that every defending front line unit within the attacker’s potential engagement frontage has leader adjacency. Flank units should be supported and weak units such as cavalry and non-Auxilia lights removed from the frontage.


This looks like a brutal card for the defender. It can turn your next activation after the battle back into an annihilation of the attacker’s units. It’s very much worth holding if you can see the attacker preparing for an assault. A word of warning, though, that it is often more disappointing than you expect. The extra dice only reach their devastating potential if you have a good number of surviving units with leader adjacency and able to close combat. If the attacker has been successful in breaking your line, your units and leaders may be scattered and poorly placed to take advantage of it. Still, a strong line defense is exactly what the card is designed for and unless you’re going to cycle it without ordering any units, what else are you going to use it for if you have it in hand? So it’s worth keeping for the main event, just don’t hang all your hopes and strategy on it.
The Thin Blue (or Red, Tan, Green, Brown, Grey, Purple, Bronze or Orange) Line
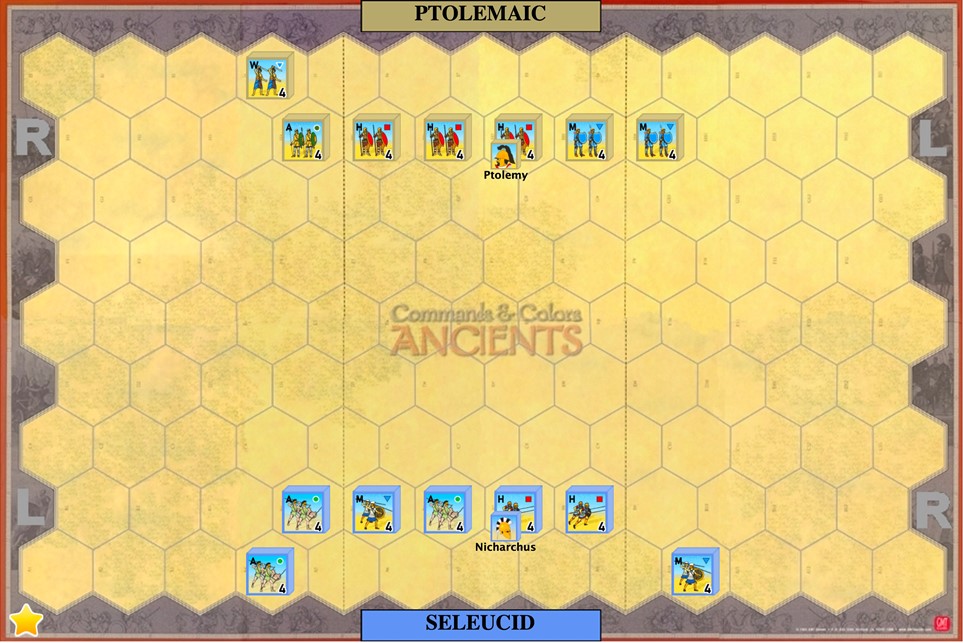
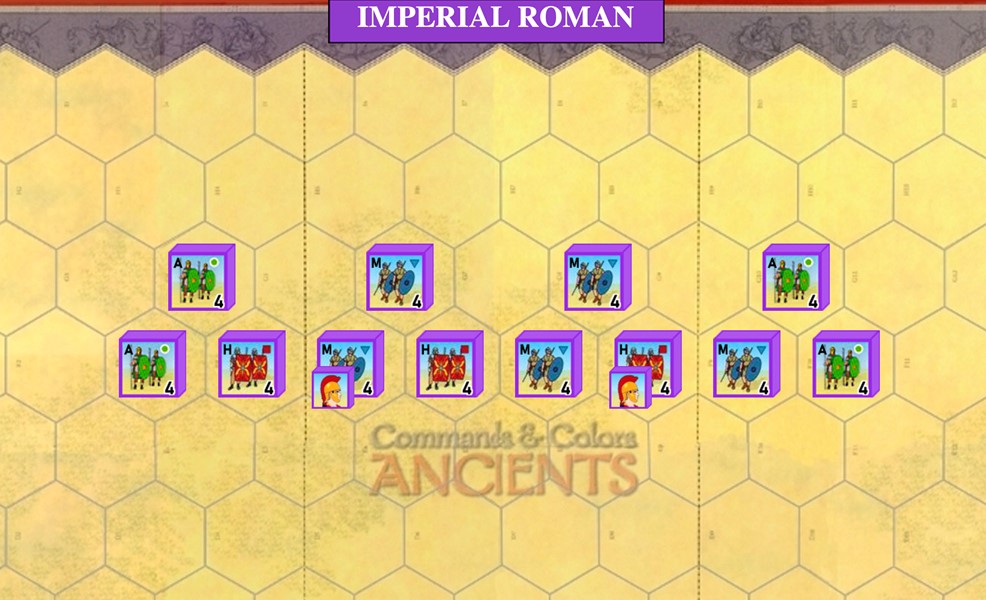
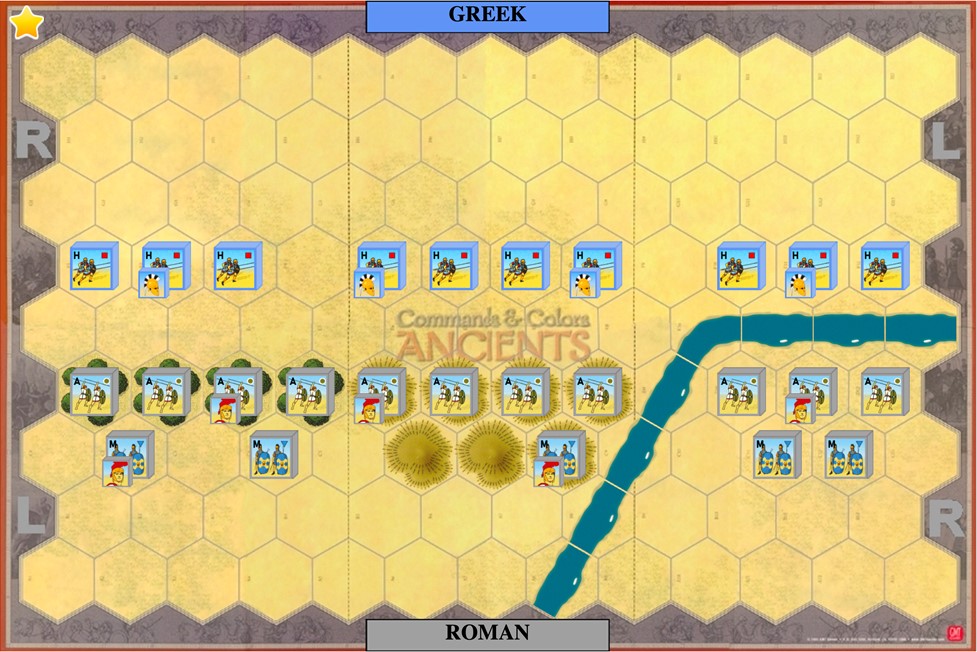
One glaringly obvious weakness is presenting a thin, single line of infantry, as we have seen how brittle it can be in the face of a determined assault. This may appear to be an artificial setup for the sake of the examples but a perusal of the official scenarios will reveal that it is actually the norm! Long, single rank infantry lines facing each other across the battlefield. Nowhere is this more in evidence than the Greek and Macedonian phalanx on phalanx scenarios in the highly popular first expansion. The Successor battles of Paraitacene, Gabiene, Ipsus and Raphia are prime examples, among the most well loved and frequently played of all Ancients scenarios because of their symmetry, balance and unit variety ( and when I say variety, of course I mean elephants!).
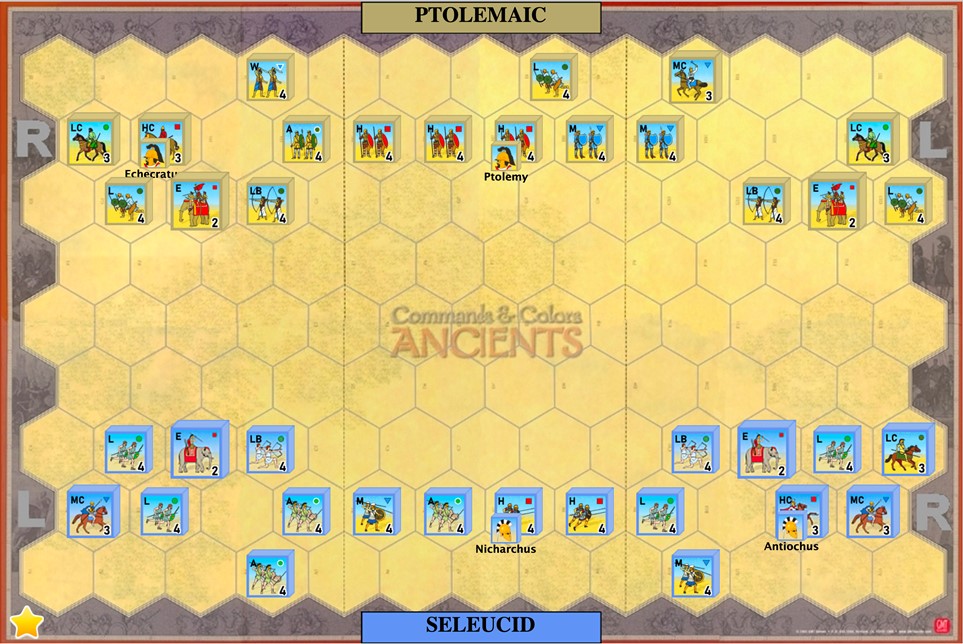
Strip away the ancillary skirmishers and mounted units from Raphia and look what we have. Long, thin, single rank lines of infantry, which will invariably decide the battle once all the skirmishing, cavalry manoeuvres and elephant hijinx are done.
What’s going on here? If these thin lines are so fragile, why were they set up that way, both historically and in game? This is yet another example of how Ancients effortlessly models history without labouring it in detail. Time and again the historical record reveals the importance of a commander extending his army’s line to match that of the enemy. Why was this necessary? To protect their vulnerable flanks, which an overlapping enemy line could exploit. And lo and behold, the same necessity applies in Ancients, as we have seen in the previous examples. Once again Richard Borg has inconveniently included flanking rules that emerge from actual play without spelling them out.
Where a commander was able, he might use natural terrain such as rivers to anchor flanks. Given the ancients’ preference for featureless bowling greens for battlefields this wasn’t always an available option and an alternative was for an outnumbered general to extend his line by thinning his ranks, sometimes dangerously. No lesser lights than Alexander and Caesar did this, at Gaugamela and Pharsalus respectively…..and we hear they did okay in these battles so maybe it’s not a terrible idea.
The other abstracted but important benefit of the extended line is to increase ordering options. Clump all your infantry in one section and your ability to use other section cards is hampered. Extended infantry lines gave ancient commanders greater versatility and more command options and the same is true for modern armchair commanders.


Defense in Depth
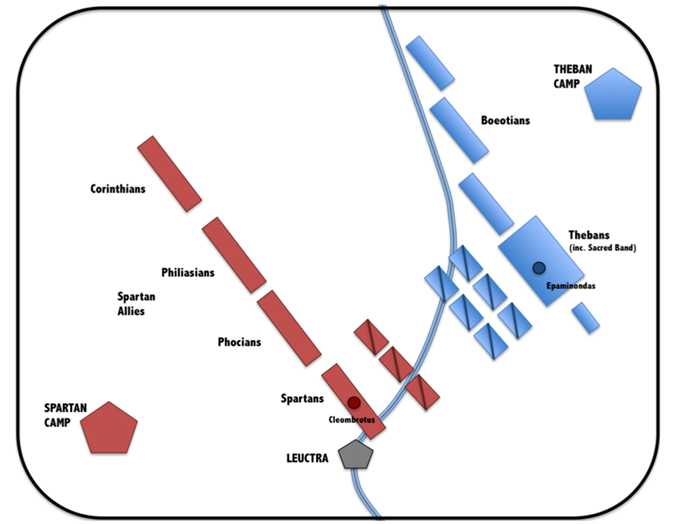
That’s all well and good but we have also seen the downside of the thin, extended line. The way to counter this fragility is to arrange a second line of infantry behind the first, to build defense in depth. There Richard Borg goes again, springing historical fidelity on players without making it obvious. Reserve lines were standard in ancient armies and deep formations the signature feature of several notable battles. This is what Caesar did on his right flank to win Pharsalus, and it was Epaminondas’ overloaded deep left phalanx that broke forever the Spartan dominance of the battlefield at Leuctra.
How does a second line help? It covers many evils when a front line unit is eliminated. It can keep the defensive line intact, ensure mutual support among defensive units, give evading leaders a secure haven and create those pockets of death that none but the most foolhardy attacker would dare advance into.
A less resource intensive second line can use alternating reserve units. Almost as solid.
However, in either case deepening the line means shortening it, potentially exposing those flanks and limiting those ordering options. Of course you have other units like cavalry and skirmishers to occupy those flank sections, but the principle still applies. Striking the balance between width and depth as defender depends on cards and units available and how and where the enemy is threatening.
When Is a Line Not a Line?
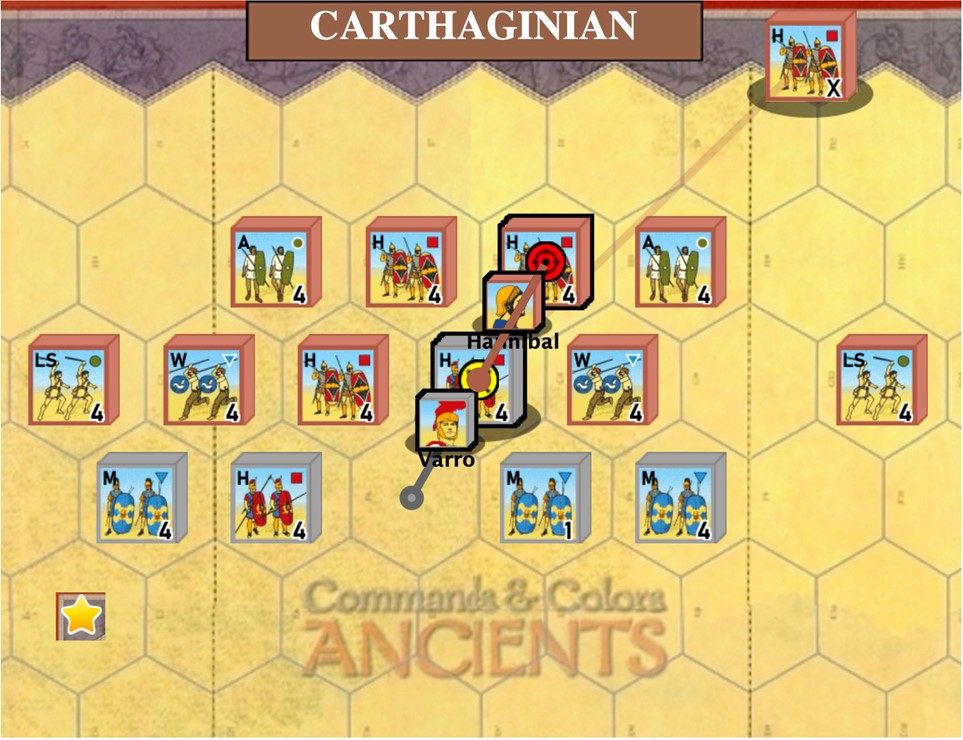
It should be noted that a deep defense doesn’t have to be a continuous line. One of my favourite strong defenses is to form separate clusters of units around leaders. This works very well across section border hexes if your army has a limited number of leaders. A prime example is commanding the Romans and their two leaders, Regulus and No Name, at Bagradas.

The Romans tend to be in a defensive posture in this scenario because of their 4 to 6 command disadvantage. Given time and the right orders, the following is my favourite setup to receive Xanthippus’ attack.

This neatly illustrates several other points I wanted to make. The first you’ll notice is that in each case the leader is on a border hex. This significantly increases the options to order his unit, to detach him with section cards to move to areas of need, or to utilise section specific Leadership cards.
Second is that the leader is positioned behind the front line units, providing leader adjacency but shielded from the first frontal assault. When assaulting a line you want your leader in the front rank, risking leader check death for the opportunity of a momentum advance. This doesn’t apply to the defender. If defending in depth, pushing other units to the fore and letting them bear the brunt of the assault will protect your leader from the crap shoot of a leader check and leave his unit fresh for the counterattack on your turn.
Third, after talking down Auxilia when discussing the attack, I’ve put them in the front rank of the defense. One reason is that they are what this scenario offers and their mobility makes it easier to get them into position before the Carthaginian attack arrives. In principle, though, Auxilia are not a bad choice for the front rank of the defense, because of their ability to shoot at the enemy as they make their approach. At Bagradas they are a particularly good front line to receive an elephant charge if Xanthippus is careless enough to do so, because the elephants will roll less dice than they would against the Mediums and Heavies and are very likely to be destroyed by the well prepared infantry clusters. Auxilia are also easier to order out of the way once damaged in the initial clash of arms. This is because of their mobility but also because of the many cards in the Ancients deck which can order greens, particularly Order Lights and Move-Fire-Move, which can teleport them through your own lines to safety, denying the enemy their victory banners.

Defending Terrain
While on the topic of Auxilia, this is also a good opportunity to discuss the defensive use of terrain, because Auxilia are the masters of terrain. We have seen how dangerous terrain can be to the attacker in the example of the Republican ramparts at Phillipi. Auxilia can shoot at the advancing enemy line at full effectiveness out of all common terrain, with the exception of rivers. In forest they can battle the turn they enter, share close combat dice parity with even Heavy Infantry and are provided protection against enemy missile fire. Downhill they have close combat dice superiority over any enemy infantry. And on rivers their best position is on the bank, where they can fire across the river at full effectiveness and share close combat dice parity with enemy infantry attempting to ford it. The defending commander should always consider terrain to be his asset, should place Auxilia in the front line on that terrain as soon as possible and avoid the temptation to relinquish control of the terrain until the end of the battle and chasing down the final enemy banners for victory.
(Another disclaimer: I’m a big fan of Scenario X….just having fun)
The Retreat Question
One final issue to consider is the decision to retreat a defending unit from the line if a flag is rolled against it. In almost all cases as defending commander you would want to ignore a flag if able in order to battle back, even if your own destruction is likely. The battle back – follow up double roll is your main advantage as defender and you want to inflict as much hurt on the attacker as possible. There may be circumstances, however, where the roll of a flag is a gift and the defender will want to retreat, even if it means forgoing the battle back.
Let’s return to Nero attacking Hasdrubal, only now let’s assume that the Roman player has only 2 more banners to collect for victory. Hasdrubal’s unit is likely to be destroyed and he will need to make a 1 die leader check. The battle could well be lost then and there if both the Roman Heavy and Medium Infantry get their rolls in.
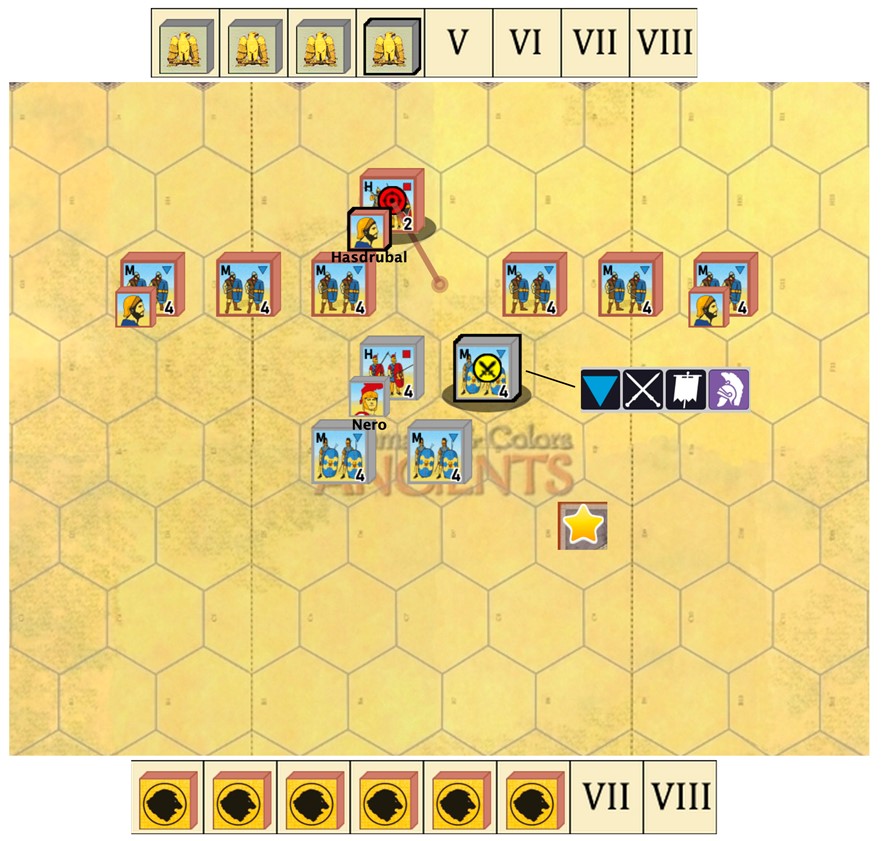
Luckily for Hasdrubal, the first roll by the Roman Medium includes a flag. Hasdrubal takes it and retreats out of range of Nero’s Heavy. It still looks grim but this may give him at least one more turn to pull something out of the bag.
There you have it. Thank you to all who had the patience to stay with me through this thesis. Please feel free to make any comments or ask questions.
Come home with your shield or on it….hopefully with it if this article has been of help!
BrentS
May, 2022

Very nice strategy series. Yes, first time players are often deceived by the systems simplicity. A few playings reveals that battles really are modeled well.
LikeLiked by 1 person
Thank you. Indeed, all those subtleties are critical and make this design great!
LikeLike
This series has me ready to give Ancients a try.
LikeLiked by 1 person
That was also the purpose 🙂 I hoe you will enjoy it!
LikeLike